By default in Fedora, Ubuntu, Mint, and other Linux distributions it is not possible to store and run steam games or Virtual Machines (Oracle VirtualBox, VMware, or other) on mounted partitions which can be on the same disk or on any other disk.
In this article, we will learn how to do that irrespective of whether these partitions are in NTFS or EXT4 formats.
NOTE: After following these steps, if SELinux prevents you from running VMs or Steam Games from mounted partitions, then follow these steps to put the SELinux in “Permissive” mode or to “disable” it entirely.
To run your VMs and games from mounted partitions (NTFS or EXT4), then follow the steps below :
Step 1: First install Gnome Disk Utility if you don’t already have it installed on your system. To do this, just go to the link and download the package for your distribution. Once downloaded, double click on it, provide your Super User password and the package will install automatically.
https://pkgs.org/download/gnome-disk-utility
Step 2: Open this utility by searching for “Disks” in Accessories in the start menu in your distribution.
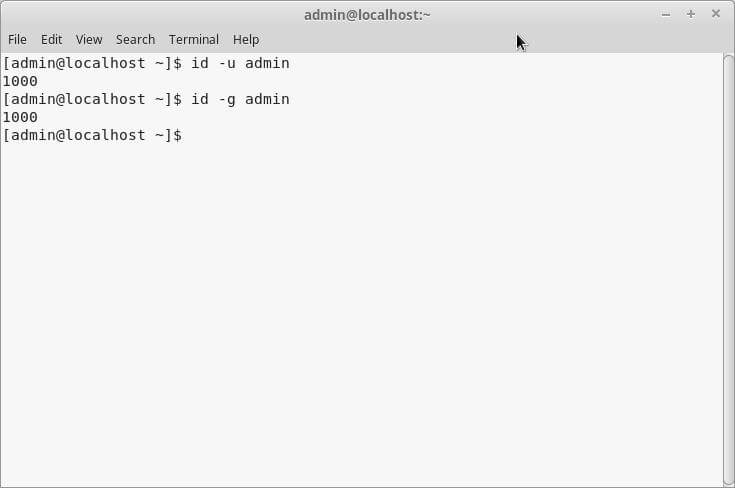
Step 3: Now open the terminal and type this command to see the group in which your User ID is :
Note: These commands work in all Linux distros.
For user ID (uid) :
id -u username
For group Id (gid) :
id -g username
NOTE: “username” here is the username that you use to log into your Linux Distro.
Generally, both are “1000”.
In the screenshot below, the “username” is “admin” and the “uid”, “gid” for “admin” are “1000” :

Step 4: Start Gnome Disks Utility by searching for “Disks” in the Startup menu in your Linux Distro. Generally, it’s located in the “Accessories” sub-menu OR just type this command in a terminal window :
gnome-disks
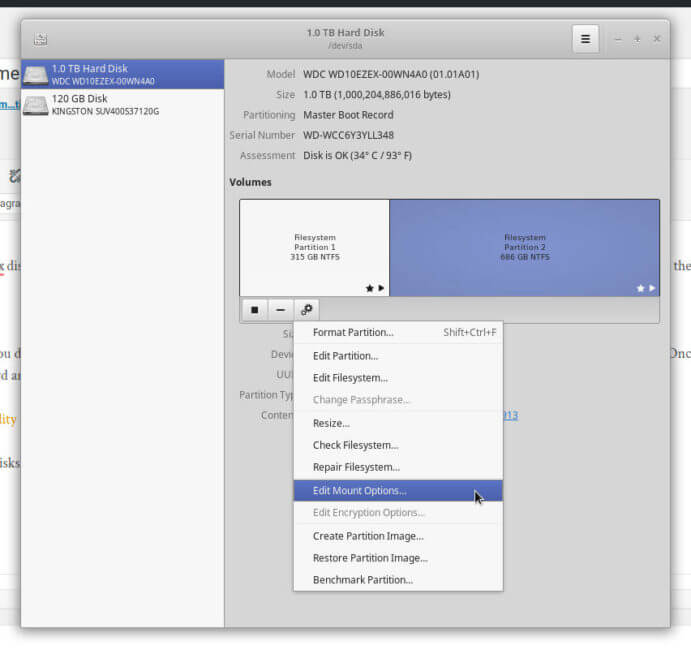
Step 4: Once the Gnome Disks Utility starts, just select the HDD/SDD and the partition where you want to store your Steam games or your Virtual Machines. In our case, we want to store our Games and VMs in 1 TB HDD in the partition 686 GB NTFS partition.
After selecting this, click the menu icon below it and select “Edit Mount Options” as shown below :
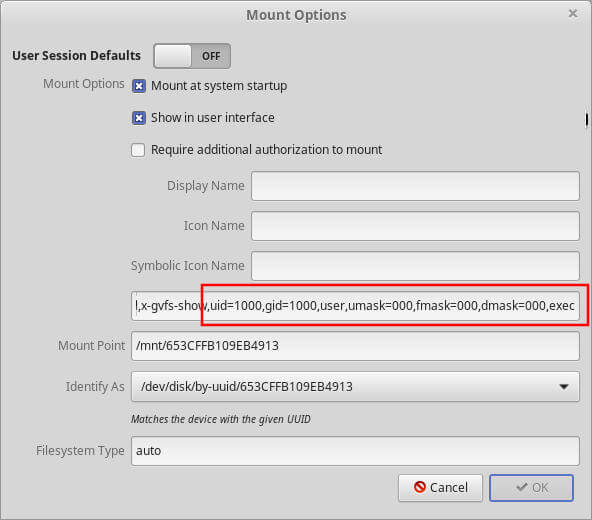
 Step 5: Once in the Edit Mount Options, Disable “User session Defaults” and make sure the options “Mount at System Startup” and “Show in User Interface” are enabled.
Now, add the following options after “x-gvfs-show” separated by a comma as shown in the screenshot. Do NOT delete any options that already exist and make sure there is a comma between all the options in the given field.
For NTFS :
uid=1000,gid=1000,user,umask=000,fmask=000,dmask=000,exec
Here “uid” and “gid” are what we determined earlier by running commands in the terminal window.

For EXT4, Btrfs:
Just add this option for EXT4 or Btrfs partitions :
defaults
Step 6: Press “OK” to save and then restart your computer. After the restart, you would be able to store and run your VMs and Steam games from this mounted partition.

